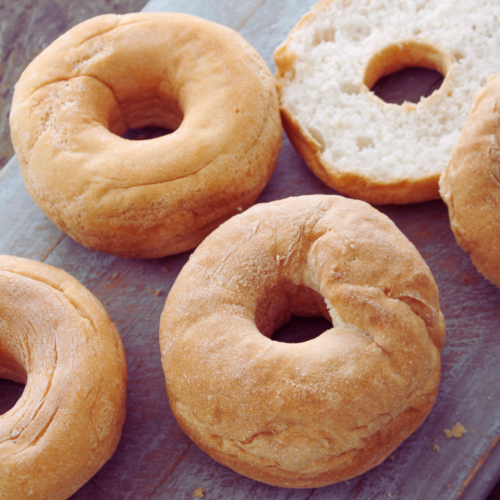
Finding a truly great bagel is often the biggest challenge for those following a gluten free lifestyle. So many store-bought options are either too crumbly, too dry, or more like “bread with a hole” than an actual bagel. This recipe changes that.
By focusing on the science of gluten free hydration and the essential step of boiling before baking, you can create a bagel that has a legitimate chew and a beautiful, shiny crust. Whether you are a seasoned baker or new to working with gluten free doughs, these homemade gluten free bagels will become a staple in your kitchen.
Gluten Free Bagels Recipe
Ingredients
- 3 ½ cups bread flour gluten free
- 2 teaspoons instant yeast gluten free
- 2 tablespoons sugar granulated
- 1 ½ teaspoons salt
- 1 cup water warm
- 6 tablespoons butter room temperature
- 1 egg beaten (egg wash)
- 6 cups water
- 1 tablespoon molasses
- 1 teaspoon salt
Instructions
- Preheat oven to 400°F
- Line a large rimmed baking sheet with unbleached parchment paper, set it aside
- In a medium-sized, covered saucepan, bring the water bath to a boil over medium-high heat6 cups water, 1 tablespoon molasses, 1 teaspoon salt
- In the bowl of stand mixer, add bread flour, yeast and granulated sugar, use a whisk to combine well3 1/2 cups bread flour, 2 teaspoons instant yeast, 2 tablespoons sugar
- Add the salt and whisk to combine well1 1/2 teaspoons salt
- Add the water and butter, and mix on low speed with the dough hook(s) until combined1 cup water, 6 tablespoons butter
- Raise the mixer speed to medium and knead for approximately 5 minutes or until smooth
- Spray a silicone spatula lightly with cooking oil spray and scrape sides of bowl
- Cover bowl with plastic wrap and place in the refrigerator to chill for 10-15 minutes
- Remove from the refrigerator, and transfer it to a surface lightly sprinkled with bread flour
- Sprinkle the dough very lightly with more flour and turn it over on itself a few times until the dough is smoother
- Using a bench scraper or sharp knife, divide the dough into 8 equal pieces
- Shape the pieces into rounds of dough
- Place on prepared baking sheet about 2 inches apart
- Place a floured finger in the center of each round of dough
- Press down to the bottom and move around in a circular motion to create a hole that is at least 1 1/2-inches wide
- Place as many of the raw, shaped bagels in the boiling water bath as can fit without crowding and boil them for about 45 seconds total
- Turn the bagels over gently to evenly boil
- Remove the boiled bagels from the water bath and return to the baking sheet
- Brush the tops and sides with the egg wash1 egg
- Add toppings (seeds, nuts, etc)
- Place the baking sheet in the center of the preheated oven
- Bake 25 to 30 minutes or until the bagels are golden brown all over
- Remove from the oven and allow to cool briefly before serving
Nutrition Details
Did you enjoy this gluten free recipe?
Let us know how it was in the comments below!The Art of the Gluten Free Bagel
Creating a gluten free bagel that rivals a traditional wheat-based version requires understanding a few key principles of gluten free chemistry. In traditional baking, gluten provides the elasticity and “pull” that makes a bagel chewy. In this recipe, we rely on a combination of high-quality gluten-free flour blends and specific techniques to replicate that experience.
Why the Boil Matters
The defining characteristic of a bagel is its texture, which is achieved through a process called starch gelatinization. By dropping the shaped dough into boiling water, often sweetened with a bit of honey or maple syrup, the exterior starches are cooked instantly. This creates a barrier that prevents the bagel from rising too much in the oven, resulting in a dense, chewy interior rather than a light, airy roll. It also helps develop that iconic golden-brown, slightly shiny crust that every bagel lover craves.
Selecting Your Flour
Not all gluten free flours are created equal. For bagels, you need a blend that includes a good balance of grains (like brown rice or sorghum) and starches (like potato or tapioca). If your blend does not already include xanthan gum, you will need to add it, as it acts as the “glue” that holds the dough together in the absence of gluten. Proper hydration is also vital; gluten free dough often requires more moisture than traditional dough to prevent a gritty finish.
Mastering the Shape
Gluten free dough is generally more delicate and stickier than wheat dough. Instead of the traditional “roll and loop” method, it is often easier to roll the dough into a smooth ball and then use a floured finger to press a hole through the center. Gently stretch the hole until it is about an inch wide, as it will shrink during the boiling and baking process. Using parchment paper to move the bagels into the water can help maintain their shape and prevent sticking.
Topping and Flavour Profiles
While a plain bagel is a canvas for creativity, the toppings are where you can truly customize your bake. The “Everything” bagel remains a gold standard, combining sesame seeds, poppy seeds, dried onion, dried garlic, and flaky salt. For those who prefer a sweeter start to the morning, adding cinnamon and raisins to the dough, or topping with a cinnamon-sugar crust, is a fantastic alternative. Always apply your toppings immediately after the bagels come out of the water bath while the surface is still tacky to ensure they stick.
Storage and Serving
Gluten free baked goods are notorious for losing moisture quickly. These bagels are best enjoyed fresh out of the oven once they have cooled enough to set. However, they also freeze beautifully. Slice them before freezing so you can pop them directly into the toaster for a quick, convenient meal. When reheating, a high-heat toast is the best way to revive the chewy interior and crisp up the exterior.
Frequently Asked Questions About This Recipe
This usually happens if the dough is over-proofed. If the yeast has worked too long, the structure becomes weak and collapses when hit with the heat of the water. Aim for a rise that is noticeable but not doubled in size.
Yes, you can prepare the dough and let it rise in the refrigerator overnight. Cold fermentation often improves the flavour and makes the dough easier to handle when shaping.
While not strictly necessary for the structure, the sugar in the honey (or barley malt syrup/maple syrup) aids in caramelization, giving the bagels a deeper colour and a very slight traditional sweetness to the crust.
If the bagels are brick-like, the dough may have been too dry. Ensure you are measuring your flour by weight rather than volume, as gluten free flour is very easy to over-pack in a measuring cup.
Absolutely. This recipe is naturally dairy-free if you use a standard yeast and flour setup. Ensure your toppings and any fats used (if applicable) are plant-based.
Standard boiling time is about 30 to 60 seconds per side. A shorter boil results in a thinner crust and a lighter bagel, while a full minute on each side creates a thicker, chewier crust.

Never thought I’d get to try homemade bagels again. Can’t believe I did it!! Thank you GFJ.
This is a WONDERFUL recipe!
There really was no rise needed. Great gluten free bagels. Nice treat for breakfast!
I’ve made this recipe dozens of times – so easy and delicious! I double or triple depending on time and also knead it by hand. I sprinkle cinnamon sugar on top before baking, have mixed in freeze dried berries, tried some dried blueberries, sky’s the limit!
I love this recipe
This is one of the best bagel recipes out there. Simple and delicious.
Loved the Bagel recipe,I make it frequently for my grandsons lunchbox
I wish I could show how beautiful these come out!
Thank you for your sharing. They turned out great!